My second home away from home…
The first time i went to Africa, that was in 2009 in jun, i went to Ghana, when i got there i immediate was struck by the intense heat and i thought to myself, wow am i going to be able to cope with this, and you know what i did, and still do. Since that time, i have been going and coming around 20 times already, and i will not stop going there for as long as i live, this for many reasons, the biggest being i reely love my Ghanian family and the friends over there i got in the years since my first time, but also because the warm and moist weather makes my life much easier then staying home in Sweden during winter. This little boy, my Godson, is as dear to me as my biological grandchildren are, the differ- ence between them are that they have al the chanses in life to become what ever they want, but this little bundle of pure love and joy have not, so thats what i will change no matter what obstickle i run into, i will see to it that he can become what ever he wants to, so help me GOD.Customize this document
To create your own Web Story document, just customize the header photo, and your text, add additional graphics or photos, and then just Share the result. I’ll show you how to do each of these things.Replace the header photo
Just click it and select the Replace option. You can select to upload a photo from your computer, or pick one from a cloud drive. Perhaps the easiest way to replace the photo with a local one, is to just drag a photo file from your file explorer onto the header photo: Tip: It’s best to use a wide or panoramic image as, on the version you share, the image is stretched to fit whatever browser width you have. You can drag and drop replace any photos on the page including the inline ones below.Adjust the picture:
You can adjust the horizon or rotation of the photo within its frame, as well as its size using this icon in the top right of the photo. If you have enlarged the image so some of it’s clipped, just drag on this hand icon to re-position within the frameChange the Theme Color
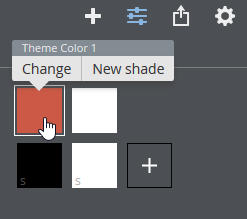
A really great trick that makes your web story look more professional, more ‘designed’, is to re-use key colors or shades from your photo. So in this document I’ve used redish-brown color that fits well with the image. Xara Designer uses document-wide Theme Colors, which if you change, affect the whole document. So to change this color, select anything that’s using the color (e.g. place the text cursor in a heading, or select the colored stripe under the photo) and click the color patch on the Proper- ties Panel. This opens the color palette (see left). In this document there are just two main colors used, the redish Theme Color 1, and a white color called ‘Light text’ which is the shade used on the heading and the buttons at the top. Below the named color are a fixed (always available) black and white, and shades of gray. If you hold the mouse pointer over the color a pop-up menus shows the name of the color and a option to change it. Select the Change option and you get a color picker where you can change this to any color of the spectrum. Note as you change this, the whole document is updated. If you want to create a completely new color, just click the + icon.Adding photos into the story
Using the + menu top right, you can add an image to the page (as a local file or from your cloud drive), or you can simply drag and drop a image file onto the document and it will be uploaded. Resize it as required by dragging the bottom right corner. Images added this way are floating - you can drag them to any position on the page, but you might want the picture to push the text out of the way. There are two ways to do this:Repel text around
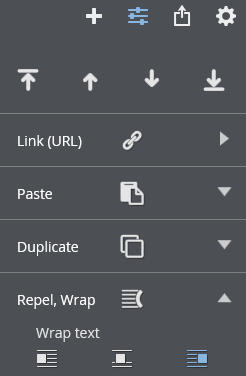
Select the photo and use the Repel, Wrap, option on the right panel to select Repel text option. Now as you move the photo over your text it pushes the text out of the way to flow around the picture.Or inline
But suppose you want to embed it inline, so it flows with the text. To do this cut the picture (Ctrl+X), place the text cursor where you want in the text and Paste (Ctrl+V). Now the image is inline. You can even wrap text around the left or right of an online picture. Use the same Repel, Wrap options and choose on of the ‘wrap text’ options. This picture on the right has the ‘wrap text left’ option selected, so text wraps around the left side.Share with friends, colleagues, the world
The point of a Web Story is to publish and share this with the world. This couldn’t be easier. Click the share icon, top right and select Share... You will get a URL link after a few seconds that is a read-only version. The is only visible to those you share the URL with - so it could be just your friends, of the whole world. Update when you’re ready: Your readers see a read-only version that is only updated when you select the Share option again and select Update. This means you can carry on working on edits and only re-publish when you want.Photo animation
When you share the read-only version of this document, e.g. here, and you scroll down you’ll see that the photos fade-in as they are revealed. This is one of many scroll and reveal animations that are possible in the desktop Xara Designer. You can’t (yet) control the animations in Online Designer, but if you want your photos to fade in this way, just re-use one of these pictures. To do this copy it, and paste (or paste into the text), then replace the picture with your own, and adjust the size and crop as required. This photo also has a pop-up effect when you click it (on the published version).Adding links or buttons
At the top of the page are two buttons. The easiest way to add more buttons, is to simply copy one of these - click on the outer edge of one of the buttons at the top, and select the Duplicate menu option. Or you can add other button designs. Under the + insert menu there’s a Buttons category. Here’s another example placed inline (cut and paste it in the text as described above). Note that the button automatically takes on the Theme Color used in the document. You can edit the text on the button just by clicking on the text. Edit the link as required. To select the button (not the text inside) click on the edge of the button. You can then resize it (and copy, delete etc). To edit the button text just click on it - the button will adapt its size to the content. You can adjust the alignment by placing the text cursor and using the usual align text options from the right-side Text Properties panel. Adding a link to text is as easy as selecting the text, and using the link icon on the right.Text Styles
This template has preset test styles. These are selectable from the Text Style drop-down list on the right side Properties panel. There ‘Normal text’ which is this main text style, and then four heading sizes, which you can see used throughout this document.Line Lengths
For maximum readability it’s often recommended that line should not have more than around 15 to 20 words per line - longer than that and the eye has more difficulty moving from the end of one line to the start of the next. So this column width, in combination with the font and font size, is the upper end of that recommendation. I would not have the column width any wider than this. The Font I’m using here is a Google font called Droid Serif, 16px size (which is the equiva- lent of 12pt in print terms), so quite large, using a generous 140% line spacing. Some studies suggest using a serif fonts improve readability. Certainly it’s more common for longer text stories, such as most novels, to use a Serif font like this. To customize this font (or create your own templates), use Xara Designer desktop software.


“This is a pull-quote from some
text in your story. It’s an eye
catching highlight or a teaser
meant to draw people into your
story at a glance.”